
Custom Sensors in Race Studio 3
For a video of this, check out our AiM webinar at
With the release of AiM's next generation of loggers (the MXL2 and MXG), they have started the transition over to Race Studio 3. The new software package has significantly increased capabilities in the dash programming, sensor configs, and the two digital outputs. Many people have some trouble creating the custom sensors and/or understanding all the different way they can use them. This Featured Article will help with that and teach folks how to use some of these new features.

After you open up RS3, you will want to click the new sensor configuration button to bring you to the sensor module. Once in the module, you will want to select "New" to start building your new sensor. Once you do that, you'll have a chart, graph, and a bunch of other info you will need to configure for your sensor. In our example, we'll build the sensor profile for a Texense INFKL infrared tire temp sensor. In practice, you wouldn't have to do this as AiM has this sensor already in their prefonfigured library along with a large assortment of other popular.
To start this process, the first thing you need is the millivolt and sensor reading chart. For us, the chart is reading temperature, but for a pressure sensor it would be PSI, Bar, ATM, etc. From this point, it's really not too hard of a configuration.

The second thing is to name your sensor. I believe it's a good idea to name the sensor exactly as the manufacturer does, so then you can go back at anytime and know exactly what sensor you have. General names like "oil pressure 150" or "coolant pressure" are not specific enough to help you down the road.
After naming your sensor, you want to select the measurement type and the calibration. The measurement type for us is pressure, but it could be a huge range of things including pressure, level, voltage, rotation, G force, etc. Once you have selected the measurement type, you have to pick if you want the sensor to be auto calibrated or none. For our sensors, there will be no calibration because the readings will always be based off the data we enter. For things like a displacement sensor or rotation, you'll have to choose the appropriate calibration.
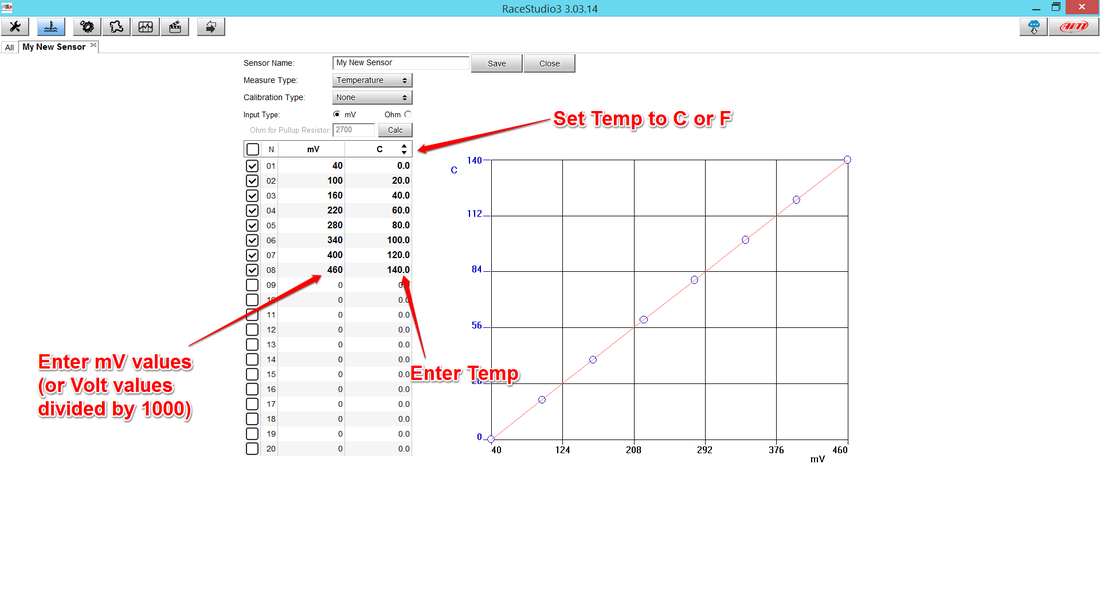
Fourth, you have to enter the milliVolt (mV) values for the sensor, along with the temperature values that go along with the mV readings. Once you have done that, it's time to click save! That wasn't too hard, now was it?
Now, there are some variations and different ways you can work with the tables. Many sensors, including fuel level sensors, some temperature sensors, and measure resistance, not voltage. On those, they require a "pull up" resistor, but the new RS3 sensor configuration helps you out greatly. You can enter the resistance values and it will tell you what size pull up resistor you need. You can also tell it the pull up resistor size if you want to do that as well!
For folks who have an MXL, Evo4, or other AiM products that use Race Studio 2, check out this great documentation put together by AiM on how to make a custom sensor in RS2.
Recent Posts
-
Position Sensors
So you want to know where something is? There are a lot of options! In motorsports we measure the po …Feb 2nd 2025 -
Pressure Sensor Info
So you want to measure a pressure? Gauge or absolute? Air or liquid? If air, gauge, absolute, or dif …Jan 22nd 2025 -

Driver health, monitoring, and performance
I was surfing Instagram and saw Dr. David Ferguson, of the Spartan Motorsports Performance Lab, post …Mar 22nd 2022